Wireguard - Review & Benchmark
Posted on April 2, 2022 • 11 minutes • 2326 words • Other languages: Français
A - Introduction on the general functioning
Wireguard is a recent (2017) VPN protocol and under free license. In 2018 it is integrated in the Linux kernel.
Here is an interesting quote1 from Linus Torvalds from the mailing-list about the Linux kernel:
I see that Jason actually made the pull request to have WireGuard included in the kernel. Can I just once again state my love for it and hope it gets merged soon? Maybe the code isn’t perfect, but I’ve skimmed it, and compared to the horrors that are OpenVPN and IPSec, it’s a work of art. Linus 1
Let’s review some interesting features of Wireguard:
- Wireguard has the distinction of being simple: 4000 lines of code versus +400,000 for OpenVPN for example and +600,000 for IPsec.
- WireGuard has therefore a less important attack surface and a much better performance than OpenVPN or IPsec (see my tests below in the article).
- Wireguard only works with UDP, no TCP. It is fully compatible with IPv4 and IPv6.
- Wireguard was created to be as easy to configure and deploy as SSH. VPN connection is done by a simple public key exchange like SSH. Wireguard manages IP roaming and there is no need to manage connections or check their status, or manage daemons.
- Wireguard at the cryptographic level uses the current state of the art in the field : elliptic curve and the best hashing algo ready for quantum computing. It does not allow to use other crypto suites to my knowledge. This makes it incompatible with old systems, but also much more resistant to downgrade attacks that try to negotiate a connection with crypto suites that would have security holes for example.
- Finally, the performance is excellent, especially because it is integrated into the kernel, it only has 4k lines of code and uses the fastest crypto suites.
B - Network interfaces
WG works by adding one or more network interfaces named wg0, wg1… You can configure these interfaces like any other : add routes, nat, set an ip… For the specific network aspects of wireguard you will have to use the wg utility. The name of the network interfaces is totally free, based on the name of the conf file.
C - Installation and deployment
1 - Installing the package
Under Debian 11 :
|
|
If you are under Debian 10, it is necessary to activate the backports of the distribution.
2 - Public/private key generation.
In order to ensure maximum confidentiality, the umask should be set to 077 before passing these commands:
|
|
To generate a private key the command is :
|
|
To generate the public key derived from the private key, the command is :
|
|
We can combine these commands into a single line for convenience :
|
|
Usually the private key will go into the /etc/wireguard/wg0.conf file. The public key can be found easily by displaying it with: wg show wg0 (or just wg if only one interface)
The white paper states that key transfers are not managed by Wireguard, as for SSH it is up to you to transfer your public keys according to your methods/tools.
3 - Launching wireguard
There are two ways to launch wireguard :
- with each command
- with the
wg-quicktool
3-1 - With each command
With each command for example :
|
|
From there, the interface is mounted it will remain to add the keys of the peers and the endpoints and for that always in manual mode there are two options, either one will read the file a file of conf containing the infos of the peer and the interface with :
|
|
Or without the wg tool :
|
|
That’s it… with Wireguard it’s all about networking :)
3-2 - With the wg-quick tool
The wg-quick tool allows to pass the ip commands for us, that is to say :
- Create the network interface of type wireguard
- Add the IP to the interface
- UP of the interface
- Adding the routes
- …
The wg-quick tool will base itself on what is present in the file /etc/wireguard/wg0.conf where wg0 is the name of the interface. wg-quick up wg1 will read for example the file /etc/wireguard/wg1.conf.
3-3 Tips and more complete commands
I have based the following on the man commands.
The syncconf option of the wg command :
syncconf
Like setconf, but reads back the existing configuration first and only makes changes that are explicitly different between the configuration file and the interface. This is much less efficient than setconf, but has the benefit of not disrupting current peer sessions. The contents of must be in the format described by CONFIGURATION FILE FORMAT below.
The strip option of the wg-quick command :
Use strip to out-put a configuration file with all wg-quick(8)-specific options removed, suitable for use with wg(8).
So I combine these two commands to modify the /etc/wireguard/wg0.conf file “without disrupting current peer sessions”. This is the typical case for adding a client on a server for example.
The final command will be :
wg syncconf wg0 <(wg-quick strip wg0)
Beware, <(command) is a process substitution in bash and if you add a space between < and ( there is an error, I got stuck on that for a while 😬.
4 - Automate the launch of the WG interface
To start wireguard as a service, just enter :
|
|
wg0 being the name of the wg0.conf file in /etc/wireguard.
To perpetuate at each boot of the machine :
|
|
Which must have as an answer :
|
|
5 - Example of config file
Config file /etc/wireguard/wg0.conf of my VM1 :
|
|
Config file of my VM2:
|
|
As indicated in my note below (see “Client/server or server/server” or the “roaming” part of my “Notes on the white paper”) in this configuration only VM2 can ping VM1. Indeed, VM2 knows the endpoint of VM1 but not the reverse.
On the other hand, from the first ping of VM1 to VM2, VM1 will dynamically update its cryptokey tab by adding the endpoint of VM1 which will allow VM1 to answer or initiate a connection later.
D - Benchmark : OpenVPN vs Wireguard
1 - Client/server or server/server
To remember in all cases: **In order for two hosts to communicate, each must have the other’s public key.
Then we can want a peer to peer or site to site VPN which is the same as client/server or server/server.
In the case of a client/server connection, it is always the client who will want to connect to the server. The client must therefore have the Endpoint:port of the server. The server, on the other hand, does not need to have the client’s endpoint:port. Obviously the server will not be able to initiate a communication with the client, because it does not know where it is. On the other hand, it will be able to answer him because it will dynamically update the endpoint:port from the moment the client contacts it. In my tests it is obvious, as long as the client has not pinged the server, the server cannot ping the client. As soon as the client has pinged the server once, the server can ping the client. This technique allows perfect roaming because the client can change connections all the time. By the way, the wg command is updated automatically, as can be seen with watch -n 1 wg , at the time of ping, the cryptokey table is updated with the client endpoint.
In the case of a server/server communication, it will be necessary to specify the endpoint:port on both servers in order to have a connection that can always be initiated by one or the other server.
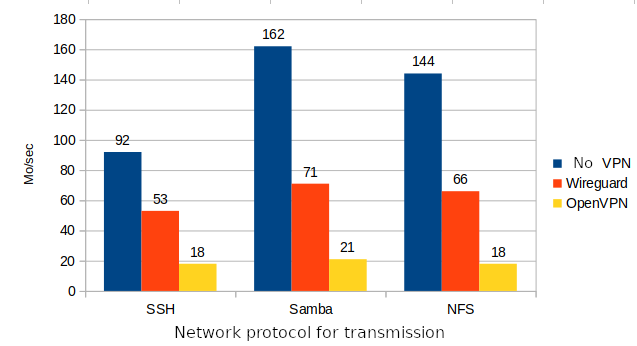
2 - Benchmark Wireguard
To avoid any fluctuation of speed or latency due to the Internet network, I only worked locally for these tests. All the tests are done between two VMs on my laptop, on a gigabit local network. The VMs have : 512MB of RAM and 2 cores of i7-8550U. The storage is on SSD. The test file is a 1GB file that can be downloaded on proof.ovh.net OpenVPN is set to UDP for this test.
2-1 - Rsync over SSH
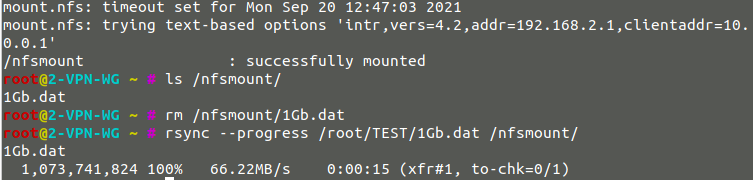
Rsync by the network and thus by SSH of a 1Gb file:
- Speed without VPN : 92Mb/sec
- Speed with Wireguard : 53MB/sec
- Speed with OpenVPN : 18MB/sec
Without VPN :

Wireguard :

OpenVPN :

2-2 - Local Rsync by Samba share
The test done is on a Samba set to plain (without AES)
I mounted a samba on VM-1, I mounted the samba share on VM-2 on the mount point /smbshare
I ran an rsync of the 1GB file. Since the mount point is local, rsync doesn’t go through an SSH connection with VM-1 so there is a noticeable performance gain:
- Speed without VPN: 162MB/sec
- Speed with Wireguard : 71MB/sec
- Speed with OpenVPN : 21MB/sec
Without VPN :

Wireguard :

OpenVPN :

2-3 - Local Rsync by NFS share
The test performed is on an NFS share set to plain (without AES)
- Speed without VPN : 144Mb/sec
- Speed with Wireguard : 66MB/sec
- Speed with OpenVPN : 18MB/sec
Without VPN :

Wireguard :
OpenVPN :

2-4 - Conclusion of the Wireguard benchmark
In my test conditions, Wireguard is on average 3.3x faster than OpenVPN.
To go further and better understand Wireguard, I recommend reading pages 3 to 7 of the white paper available on the Wireguard website
Here are my reading notes.
Some notes from the white paper (page 3-7)
WG is stateless, no need to deal with connection/disconnection/demon etc… WG like SSH does not deal with key exchange. The keys are short and therefore simply shareable. “Finally, WireGuard is cryptographically opinionated, it doesn’t use old protocols or crypto suites, only some of the latest ones and there is no flexibility on that. That’s what makes it very strong too. WG has a built-in DoS protection using “a new crypto-cookie mechanism for IP address attributability”. So WG only works on layer 3 and nowhere else and supports both ipv6 and ipv4.
How WG routing works: The fundamental principle of a secure VPN is the association between peers and an IP address that is authorized as source IP. In WG peers are identified strictly by their public key (32bits Curve25519). This means that the operation is a simple mapping between a set of authorized IP addresses and public keys. It’s as simple as that.
Here is an example of a crypto key routing table:
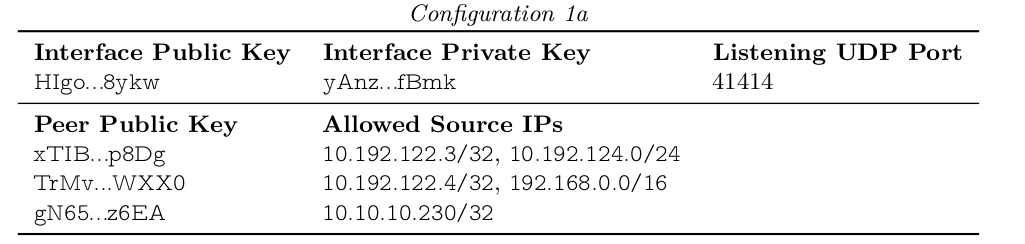
The interface itself has a private key and a listening UDP port, this is the first line. This is followed by a list of peers identified by a public key and each peer has a list of allowed source IPs.
When a packet is transmitted by a WG interface (ie wg0) the table is consulted to determine which public key is used to encrypt the packet. For example a packet with destination IP 10.192.122.4 will be encrypted using the key TrMv….WXX0. Conversely when wg0 receives the encrypted packet after decryption AND authentication of the packet it will be accepted only if the source IP is resolved in the table and in the line that corresponds to the public key used to encrypt the packet. For example if the packet is decrypted from xTIB…p8Dg, it will be accepted only if the source IP is 10.192.122.3 or if the IP is in the range between 10.192.124.0 to 10.192.124.255. Otherwise the packet will be dropped.
As a result, firewall rules are simple and any packet arriving on a WireGuard interface will have an authentic and reliable source IP (in addition, of course, to the guarantee of perfect transport secrecy via encryption). This is only possible because WG is strictly based on layer 3. In case you want to route all traffic through a WG peer to another WG peer this is possible by simply configuring the cryptokey routing table as follows:

“Here, the peer authorizes HIgo…f8yk to put packets onto wg0 with any source IP, and all packets that are outgoing on wg0 will be encrypted using the secure session associated with that public key and sent to that peer’s endpoint.”
**Endpoint and roaming: It is important that peers can communicate over the Internet with source IP addresses that are not necessarily specified. This is why pre-specifying an external IP and a UDP port is optional. It is optional because if WG receives a correctly authenticated packet from a peer, it will use the external source IP to determine the endpoint. Since a public key uniquely identifies a peer, the source IP of the encrypted WG packet is used as the remote endpoint.
IMPORTANT: note that the listening port and the sending port of the packets is always the same! This adds simplicity and better reliability especially when traversing NAT. So WG knows that if the packet comes from x.x.x.x:21841 it will have to reply on this same port. So there is no need to keep a NAT session open for example as the port will not change, however: “the interface can be optionally configured to periodically send persistent authenticated keepalives”, this is the option: PersistentKeepalive = XX.