Hardening TLS
Posted on April 16, 2022 • 10 minutes • 2046 words • Other languages: Français
Before starting this article, a small point of important language. In computer jargon, there is a common abuse of language: To speak of SSL when referring to TLS. Indeed, it’s been about 20 years since TLS replaced SSL but habits die hard. Come on, I believe in you, in 66 days you will never speak about SSL but about TLS thanks to me !
In this article about cyber security and around TLS in particular, I will teach you how to strengthen your TLS configurations on your servers. This article is not exhaustive, but I have tackled the most fastidious settings that are generally unknown or poorly known.
The topics I cover are:
- The HSTS mechanism
- The DNS CAA field
- The choice of cipher suite
- The RSA key size
- Testing your TLS configuration
HSTS (HTTP Strict-Transport-Security)
A - What is HSTS ?
HSTS for HTTP Strict-Transport-Security has been around since 2012 and is an HTTP response header that informs the browser (or any other HSTS-enabled user agent) of the HTTP security policy to adopt, namely that of: connecting in the future exclusively via HTTPS. In addition, this policy also defines an applicable time period.
B - Difference between HTTP/HTTPS and HSTS redirection
The difference is simple: a permanent 301 redirection is performed on the server side, the HSTS policy (after the first connection) is performed on the client side and it is exactly in this difference that the security benefit is !
C - HSTS, the protection against MITM attack
HSTS is a security mechanism that protects the user against a possible MITM attack. The so-called “Man In The Middle” attack is an attack carried out when someone comes between you and the server you are talking to (MITM ).
The classic example is the use of a public WIFI connection: you usually go to work in the local coffee shop and use their public wifi which is even registered in your PC/smartphone. Except that a malicious person can broadcast a WIFI signal that will have the same SSID (name of the signal) and the same password (don’t think it’s difficult, you can even do it from a laptop…). When you arrive at your usual café, you open your laptop or even your smartphone as usual and start surfing the Internet. Except that without knowing it you are not on the café’s WIFI connection but on the hacker’s, your terminals have connected to it transparently because the name of the signal and the password are already recorded.
You are now vulnerable to many things (DNS poisoning, ARP spoofing, DoS and so on…) but let’s focus on our topic. Wrongly, you think that HTTPS protects you by encrypting the connection between you and the website you are visiting. However, when you go to your bank’s website which has no HSTS header, the hacker between you and the server managing the site makes your request go through the HTTP protocol on port 80, so in clear. (I don’t detail the method but you should know that it is also very simple to do).
Please note that even if the site you are visiting has a permanent 301 HTTP -> HTTPS redirection directive, the damage is already done because the first request containing for example your session cookie has gone clear on HTTP/80 and the site will only redirect you on the next request on HTTPS/443. For you, everything was transparent and the hacker got what he wanted.
Off topic: There is a lot of silly marketing around VPNs today, but clearly if you are used to using public WIFI, subscribe to a VPN offer or, better, set yours up on a VPS for example !
D - How it works on the client side
As you can see, this is where HSTS comes into its own. The first time you visit a web site with your browser, it will store the domain in a list for the time indicated in the HSTS header of the visited site. Thus, no matter what happens and regardless of the network, your browser will never again talk to this site in HTTP/80. No more requests can be sent and the HTTP -> HTTPS address translation will be done locally by the browser.
As for the Mozilla Firefox browser, it keeps a file that it completes as you visit sites with HSTS headers. This file is called SiteSecurityServiceState.txt and is located in your Firefox profile folder.
If you want to reset HSTS for a particular site, you can either delete the line from the file or, more simply, in Firefox’s history you right click on the site and “forget this site”.
As far as private browsing is concerned, I was able to verify that the sites visited on Firefox are not added to the SiteSecurityServiceState.txt file.
E - How it works on the server side
On the server side, the setup is quick: you just have to add a line in your vhost. For example, on Apache :
Header always set Strict-Transport-Security "max-age=63072000"
The max-age option is in seconds and is by convention 2 years.
You can add the options :
includeSubDomains: protect all subdomainspreload: consent for integration on the preload list : https://hstspreload.org (see Limits of this article)
Once HSTS is set up, you can quickly check if it is OK by retrieving the header with curl.
|
|
If HSTS is not set up on the domain, there will be no return on this command. For example, if you’re at that bank that certainly puts millions of dollars into “IT security” but doesn’t know how to put an HSTS header on their server (we’re talking about a bank and a security mechanism that’s been around since 2012 🙄), you’ll get no return:
|
|
F - Bypassing an inherent limitation
As you can see, HSTS only works after the first visit of a site. This is a limit and depending on your threat model, and especially that of your users (a bank owes more security to its users than a dry sausage blog ), you may need to go further.
Google hosts and maintains a feature that is not official and not in the HSTS specification: preload
To make a long story short, it’s a list you can apply to and it contains a list of sites for which even the first connection must be done securely via HTTPS. Browsers are free to use it. The site to register your domain is here: https://hstspreload.org/
G - IP frames analysis proving HSTS working
Readers, for you, I pushed my research a bit on how HSTS works by monitoring IP frames directly with Wireshark, and if you had a shadow of a doubt, know that it works 😁 !
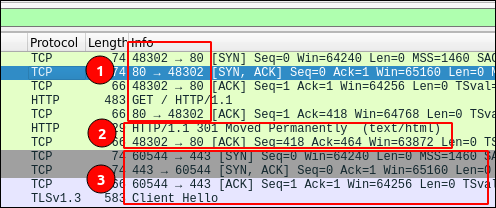
For this test, I used Firefox’s “forget this site” feature. After verification, my domain r4ven.fr has disappeared from the file SiteSecurityServiceState.txt . I then made a connection on : http://r4ven.fr and the site having never been visited, here is what happened:
- We can see that the first outgoing packet is sent on port 80 of the remote server.
- It is the remote server that indicates a permanent redirection 301, so it brings me back to port 443 of the server
- The protocol switches to HTTPS and the TLS negotiation starts
Once the site is in the list of my browser, if I try again to connect on http://r4ven.fr, the frames on HTTP/80 do not appear anymore, we are directly in HTTPS/443. The browser does the address translation locally.
DNS CAA
Any certificate authority can issue a certificate for a domain name once the applicant has proven that it controls that domain. But the control processes can be diverse and are not always based on a DNS record (e.g. a HTTP-01 Let’s Encrypt challenge). This is where the DNS CAA record comes into play!
In computer security, we often rely on the DNS protocol in order to allow an external actor to make a verification, such as
- Prove the possession of a domain (often by a verification key on a TXT field)
- Verify the integrity of an email and the authenticity of a domain (DKIM)
- Store a public key fingerprint (SSHFP)
- etc…
As for the DNS CAA record (for Certification Authority Authorization), it allows the owner of a domain name to list the certification authorities that can issue certificates for his domain.
Note that the CAA is not used by the browser to verify that the certificate issuer is authorized during a TLS client/server negotiation. The CAA is only used by certificate authorities who must verify the record when issuing a certificate. To summarize, the CAA is an additional check performed by the certification authority to prevent fraudulent certificate issuance.
Its implementation is as easy as pie, well as easy as a DNS record 😁
Without going into details (I let you consult the RFC if needed ), the structure of a CAA DNS record will be :
- Domain (your domain or subdomain)
- TTL (YOUR DOMAIN OR SUB-DOMAIN)
- Flag : 0 (standard) or 1 (blocking if the certification authority does not know the tag used)
- Tag : issue / issuewild (there are other tags that we don’t see here)
- Target : the certification authority that we authorize.
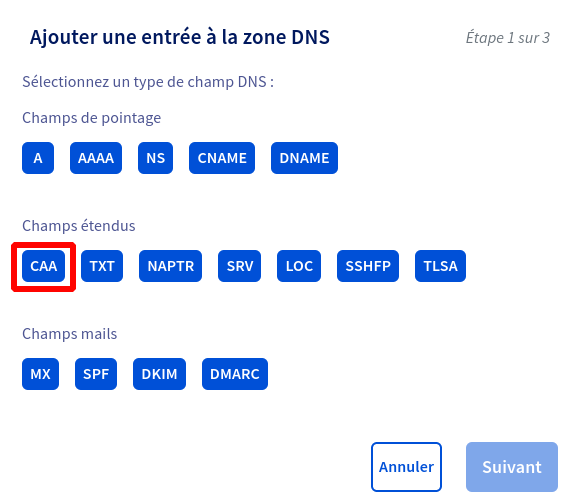
On OVH for example, a modal is provided for the CAA record to guide you:
At the domain level itself, for more information on where to place your CAA record, I recommend this very clear paragraph on the LetsEncrypt authority site: letsencrypt.org
Finally, you can check the correct placement with dig. Here for the Let’s Encrypt authority:
|
|
Cipher Suite
Before going further, if you don’t know what a cryptographic suite is, I invite you to consult this Wikipedia page .
To start with, it is important to note that encryption technologies are constantly evolving, and I advise you to have a technology watch (like my RSS feed for example ? :) ) around these topics in order to keep yourself informed of the state of the art.
As often in IT security, it’s also about adapting to your threat model and your users. Personally, I assume that someone using Internet Explorer 8 or a PC that hasn’t been updated for several years will have other problems than accessing my website because I would only allow the latest encryption protocols. And if it allows him to understand that he has to update his PC or to stop using Internet Explorer and use Mozilla Firefox instead, then it’s a winner!
Therefore, you will have understood my opinion on the subject: **limit yourself as much as possible to the current state of the art, period.
To help you in this task, I share with you a link to bookmark urgently! It is the excellent https://ssl-config.mozilla.org/
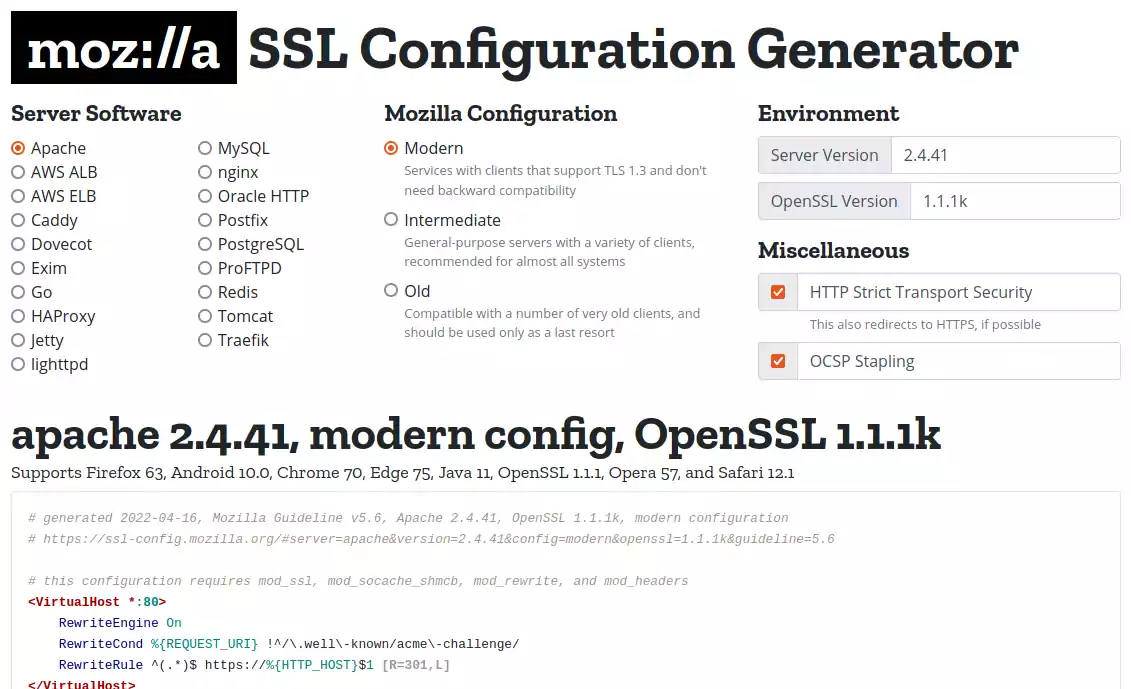
In just a few boxes, you’ll have a TLS conf that’s just right 👌
Let’s Encrypt : RSA 4096
If you use Let’s Encrypt certification authority like me, remember that by default the certbot generates RSA keys with a length of 2048bits. **I recommend that you change this value to 4096 bits.
To change this setting on Debian, edit the /etc/letsencrypt/cli.ini file by adding :
|
|
If you have already generated certificates for domains, you can also modify them on a case by case basis in the /etc/letsencrypt/renewal folder
If you are interested, I give you the link of this site which lists the recommendations of the different authorities (ANSSI, BSI etc…) concerning the size of the keys : https://www.keylength.com/fr/
Test your TLS configuration
Have you been following my article carefully and want to know if you did it right ?
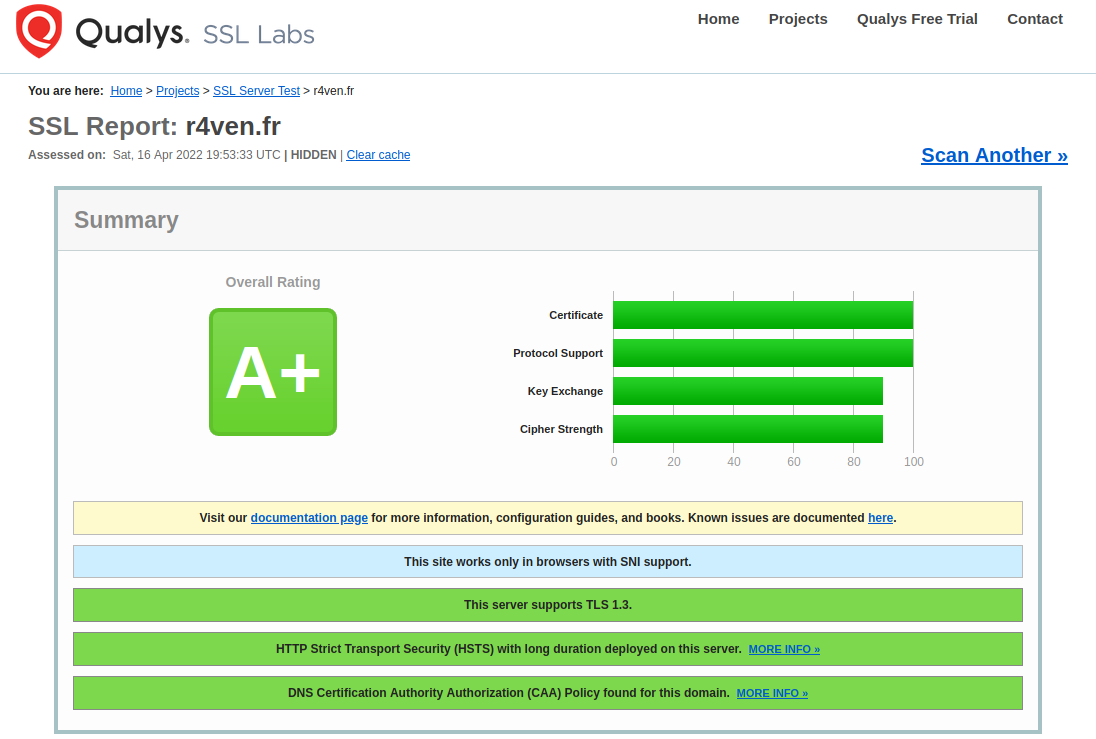
There are several websites that will test the setting and give you a rating ! Among the most famous ones, I advise you: https://www.ssllabs.com
But you also have a site developed by the excellent @aeris22 which will allow you to test your configuration, it’s here : https://tls.imirhil.fr/
I hope you will get a beautiful A+ like me ! Now it’s your turn.